Getting Started with Spring Content REST
What you'll build
You'll remove redundant code from the document list web application that we produced in our first Getting Started Guide.
What you'll need
-
About 30 minutes
-
A favorite text editor or IDE
-
JDK 1.8 or later
-
Maven 3.0+
How to complete this guide
Before we begin let's set up our development environment:
-
Download and unzip the source repository for this guide, or clone it using Git:
git clone https://github.com/paulcwarren/spring-content-gettingstarted.git -
We are going to start form where we left of in the last Getting Started Guide so
cdintospring-content-gettingstarted/spring-content-fs/complete -
Move ahead to
Update dependencies.
When you’re finished, you can check your results against the code in
spring-content-gettingstarted/spring-content-rest/complete.
Update dependencies
Add the com.github.paulcwarren:spring-content-rest-boot-starter dependency.
pom.xml
<project xmlns="http://maven.apache.org/POM/4.0.0" xmlns:xsi="http://www.w3.org/2001/XMLSchema-instance" xsi:schemaLocation="http://maven.apache.org/POM/4.0.0 http://maven.apache.org/xsd/maven-4.0.0.xsd">
  <modelVersion>4.0.0</modelVersion>

  <artifactId>spring-content-with-rest</artifactId>

	<parent>
		<groupId>com.github.paulcwarren</groupId>
		<artifactId>gettingstarted-spring-content</artifactId>
		<version>0.0.1-SNAPSHOT</version>
		<relativePath>../../pom.xml</relativePath>
	</parent>

	<dependencyManagement>
		<dependencies>
			<dependency>
				<groupId>org.springframework.boot</groupId>
				<artifactId>spring-boot-starter-parent</artifactId>
				<version>3.3.2</version>
				<type>pom</type>
				<scope>import</scope>
			</dependency>
		</dependencies>
	</dependencyManagement>

	<dependencies>
		<dependency>
			<groupId>org.springframework.boot</groupId>
			<artifactId>spring-boot-starter-web</artifactId>
		</dependency>
		<dependency>
			<groupId>org.springframework.boot</groupId>
			<artifactId>spring-boot-starter-data-jpa</artifactId>
		</dependency>
		<dependency>
			<groupId>com.h2database</groupId>
			<artifactId>h2</artifactId>
		</dependency>
		<dependency>
			<groupId>org.springframework.boot</groupId>
			<artifactId>spring-boot-starter-data-rest</artifactId>
		</dependency>
		<dependency>
			<groupId>com.github.paulcwarren</groupId>
			<artifactId>spring-content-fs-boot-starter</artifactId>
			<version>${spring.content.version}</version>
		</dependency>
 		<dependency>
			<groupId>com.github.paulcwarren</groupId>
			<artifactId>spring-content-rest-boot-starter</artifactId>
			<version>${spring.content.version}</version>
		</dependency>
        <dependency>
          <groupId>org.projectlombok</groupId>
          <artifactId>lombok</artifactId>
        </dependency>

		<!-- Test dependencies -->
		<dependency>
			<groupId>org.springframework.boot</groupId>
			<artifactId>spring-boot-starter-test</artifactId>
			<scope>test</scope>
            <exclusions>
                <exclusion>
                    <groupId>org.junit.jupiter</groupId>
                    <artifactId>junit-jupiter-api</artifactId>
                </exclusion>
                <exclusion>
                    <groupId>org.junit.jupiter</groupId>
                    <artifactId>junit-jupiter-engine</artifactId>
                </exclusion>
            </exclusions>
		</dependency>
		<dependency>
			<groupId>io.rest-assured</groupId>
			<artifactId>spring-mock-mvc</artifactId>
			<scope>test</scope>
		</dependency>
		<dependency>
			<groupId>com.github.paulcwarren</groupId>
			<artifactId>ginkgo4j</artifactId>
			<version>${ginkgo.version}</version>
			<scope>test</scope>
		</dependency>
 	</dependencies>

	<build>
		<plugins>
			<plugin>
				<groupId>org.springframework.boot</groupId>
				<artifactId>spring-boot-maven-plugin</artifactId>
			</plugin>
		</plugins>
	</build>

	<repositories>
		<repository>
			<id>snapshots</id>
			<name>nexus</name>
			<url>https://oss.sonatype.org/content/repositories/snapshots</url>
			<snapshots>
				<enabled>true</enabled>
			</snapshots>
		</repository>
	</repositories>

</project>
Update File Entity
Add the @MimeType marker annotation to our Entity.
src/main/java/gettingstarted/File.java
package gettingstarted;

import java.util.Date;

import jakarta.persistence.Entity;
import jakarta.persistence.GeneratedValue;
import jakarta.persistence.GenerationType;
import jakarta.persistence.Id;

import org.springframework.content.commons.annotations.ContentId;
import org.springframework.content.commons.annotations.ContentLength;
import org.springframework.content.commons.annotations.MimeType;

import lombok.Getter;
import lombok.NoArgsConstructor;
import lombok.Setter;

@Entity
@Getter
@Setter
@NoArgsConstructor
public class File {

	@Id
	@GeneratedValue(strategy = GenerationType.AUTO)
	private Long id;
	private String name;
	private Date created = new Date();
	private String summary;

	@ContentId private String contentId;
	@ContentLength private long contentLength;
	@MimeType private String contentMimeType = "text/plain";
}
The contentMimeType attribute is updated with the Spring Content @MimeType
annotation so that Spring Content REST will update its value on our behalf.
Update FileContentStore
So that we can perform simple CRUD operations, over a hypermedia-based
API, update our FileContentStore by annotating it with the
@StoreRestResource Spring Content REST annotation.
src/main/java/gettingstarted/FileContentStore.java
package gettingstarted;

import org.springframework.content.commons.store.ContentStore;

import org.springframework.content.rest.StoreRestResource;

@StoreRestResource
public interface FileContentStore extends ContentStore<File, String> {
}
Remove FileContentController
Having made the above updates we can remove our FileContentController
as it is now surplus to requirements. Spring Content REST will provide
these endpoints for us.
Build an executable JAR
If you are using Maven, you can run the application using mvn spring-boot:run.
Or you can build the JAR file with mvn clean package and run the JAR
by typing:
java -jar target/gettingstarted-spring-content-rest-0.0.1.jar
Test the application
And then point your browser at:-
http://localhost:8080
and you should see something like this:-
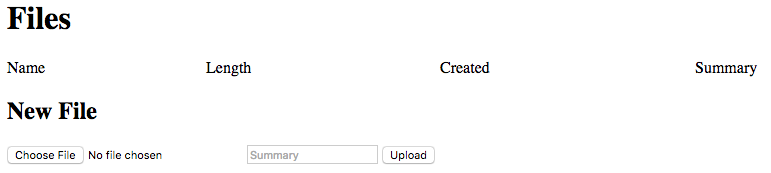
As you did in the previous tutorial, exercise the application by uploading a range of new files and viewing them. You should see viewed files open as they did before.
Test the REST API
Alternatively, you can test the REST API directly.
First create an entity:
curl -X POST -H 'Content-Type:application/hal+json' -d '{}' http://localhost:8080/files/
You should recieve a response back from your service that looks something like the following:
{
  "name" : null,
  "created" : "2020-10-20T04:17:03.733+0000",
  "summary" : null,
  "contentId" : null,
  "contentLength" : 0,
  "mimeType" : "text/plain",
  "_links" : {
    "self" : {
      "href" : "http://localhost:8080/files/1"
    },
    "file" : {
      "href" : "http://localhost:8080/files/1"
    },
    "content" : {
      "href" : "http://localhost:8080/files/1/content"
    }
  }
}
Follow the content link relation to add content either using CURL:
curl -X PUT -H 'Content-Type:text/plain' -d 'Hello Spring Content World!' http://localhost:8080/files/1/content
Or, if you prefer, by uploading the content via postman:
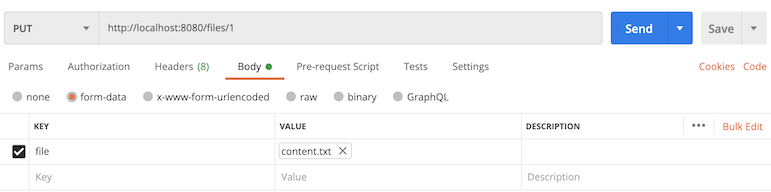
NOTE
Unlike the curl-based PUT example above this Postman request is specifying a multipart/form-data request and a form entry with a key of file and with the content of the file as the value.
Spring Content REST supports PUT and POST requests with the Content-Type header set to the actual mimetype of the content, such as text/plain or with a content-type of multipart/form-data and a properly constructed multipart form.
Lasty, verify the content was uploaded by requesting it again:
curl -H 'Accept:text/plain' http://localhost:8080/files/1/content
You should see you content returned as follows:
Hello Spring Content World!
Summary
Congratulations! You've written a simple application that uses Spring Content and Spring Content REST to save objects with content to the file-system and to fetch them again using a hypermedia-based REST API - all without writing any implementation code to handle file access.
Don't forget you can simply change the type of the spring-content bootstarter project on the classpath to switch from file storage to a different storage medium. Spring Content REST works seamlessly with all of the storage modules.
Spring Content supports the following implementations:-
-
Spring Content Filesystem; stores content as Files on the Filesystem (as used in this tutorial)
-
Spring Content S3; stores content as Objects in Amazon S3
-
Spring Content JPA; stores content as BLOBs in the database
-
Spring Content MongoDB; stores content as Resources in Mongo's GridFS